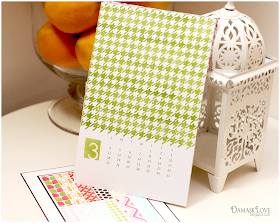
So...at this point, I suppose you could just call me the Crazy Calendar Lady. I've been making calendars like a lunatic and I've even received a few orders to make more!!!
Know what that means for you? That means that I'll be sharing lots of calendars here AND lots of free downloadable templates for creating your own.
I really and truly hope you'll find the downloads useful! If you end up making a calendar with one of my templates, I'd love to see it!!
First up, I've got the template for the Mehndi Medallion desk calendar that I posted HERE.
Before you get started with your Mehndi calendar, here are a few tips for you:
- Save the scraps
- Each page of the Mehndi calendar measures 4x6, which means I could fit two on each page. That also means that you'll have a lot of scraps after trimming down each page. Save the scraps! You can use them for making a belly band or tags for packaging.
- Pencil in the month...
- These calendar pages do not include the month. I did this so that I could stamp the month on each page using PTI's Calendar Basics. I have noted the corresponding month next to each page but when you trim this part away, you don't want to lose track of which month is which. To solve this issue, I simply penciled the month name on the back of each calendar page. Once I was done stamping, I erased my notes.
While digging through my stamps, I noticed just how many background stamps I own...many of which had never been used!
I decided to create a modern calendar that featured a bold stamped background image on each page.
Here's what I came up with (brace yourself - TONS of photos ahead!) - I've listed the supplies under each photo. For the number on each page, I used PTI's Alpha Block stamp set.
Background Basics: Geometrics with Impress Fresh Ink in Island
Background Basics: Chevron Stripes with Impress Fresh Ink in Red Currant and Pink Lemonade
Background Basics: Houndstooth with Impress Fresh Ink in Mojito
 Background Basics: Geometrics with Impress Fresh Ink in Pool
Background Basics: Tin Types with Impress Fresh Ink in Sugar
Background Basics: Gingham with Impress Fresh Ink in French Lavender (lining up that gingham just about drove me nuts!!!!!! - and it's still not perfect - which makes me even more nuts!!!!)
 Background Basics: Retro with Impress Fresh Ink in Mango
 Polka Dot Basics II with Impress Fresh Ink in Chocolate
Background Basics: Diamonds with Versafine Ink in Habanero
 Background Basics: Vines with Impress Fresh Ink in Honey, Fig, Chamomile and Harvest
 Modern Basics with Impress Fresh Ink in Mojito and Red Currant
For the front of this calendar set, I created a collage of each pattern used. I die cut a strip of the stamped pattern using the smallest die in Papertrey Ink's Rectangular Labels Die Collection.
A simple black bow finished this off and it's ready to give away!
If you're interested in stamping out one of these calendars for yourself, here's the download of the template I used:
And a few tips for using it...
- Check the page size before printing
- The finished size of my calendar is 8.5 x 5.5. If you'd like yours to be the same size, you'll likely need to adjust the page size before printing. Otherwise, the calendar will print to scale on 8.5 x11 paper. This is a good thing, since you could also do this on a full sheet of paper if you'd prefer.
- Stamp from the bottom up...
- When stamping the pattern on each calendar page, start stamping from the bottom, near the top of the printed calendar and move up. This way your pattern will end in the same place and you won't have any gaps between the calendar and the pattern.
- Stamp an extra strip of each pattern
- Once you're done stamping the pattern on to the calendar page, stamp an extra bit of the pattern onto a piece of cardstock. You'll use this extra pattern for the cover of the calendar and you won't have to pull out the stamps again when designing the cover.
Ok! Did you make it? I hope you're in the mood for more calendars - because I still have a couple more designs and templates to share!
Thanks to everyone who has left comments and sent me emails about these calendar projects! I am so excited that I've inspired others to create some gifts for the New Year and I truly appreciate your support and kindness!


Very clever! I especially like December. Great job!
ReplyDeleteLove love love, thanks for doing this, i may have to give them both a go.
ReplyDeleteLove this design - it sure takes all of decision making out of trying to put a stamp to each moth that coordinates with the holidays. Thank you for the template - I'm going to try this style.
ReplyDeleteAnother great calendar - I love how you finished off the cover.
ReplyDeleteBeautiful!!
ReplyDeleteThose patterns are gorgeous!!
ReplyDeleteI'm loving your calendars. Keep them coming! The free downloads are really generous too...thanks!
ReplyDeleteGorgeous! That red/pink Chevron is my favorite - so bright and bold. I also made a desk calendar this past weekend - they are so much fun!
ReplyDeleteI love this! (and the mendhi one too) Thank you SO MUCH for the downloads!
ReplyDeleteAbsolutely LOVING these, Amber! Thanks so much for the Calendar template downloads. I'm loving the variety of these...thanks for the inspiration! :) Keep 'em coming.
ReplyDelete