It's in the Bag
The January Clear and Simple Stamps release is full of amazing dies that are perfect for creating gift boxes and favor bags. Since I love to papercraft and party plan...this challenge is right up my alley!
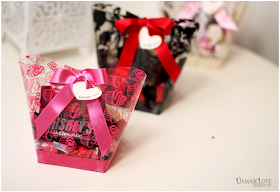
With Valentine's Day right around the corner, I thought I'd create a trio of treat bags for the holiday. I also wanted to create something using the Party Favors #2 Die Collection
This particular die collection includes three dies. One for the bottom of the gift box...and two tops (one basic and one decorative). Of course, you can use these dies to make a ton of amazing gift boxes, but I also want to share a couple of ideas for stretching your usage of these tools. Today, I'll be sharing one of my ideas and I have another project using Party Favor #2 that I'll showcase in this Saturday's Style Watch!
For today's project, I created something that I'm calling "Bag Boxes". They are SUPER simple to make!
Here's a little photo tutorial on creating these...
I die cut and assembled the basic top that is included in Party Favors #2. I also trimmed a piece of patterned acetate to 12" x 4.25". For this project I used Hambly patterned acetate.
I adhere Scor-tape around the outside lip of the box as shown.
**Tip: Scor-tape works best for this because it is super sticky and you don't want any problems keeping the acetate adhered to the box top.
Next, it's just a matter of adhering the length of acetate cardstock around the box top and filling it up with treats!
To close the bag, I punched a hole in both sides, and tied a ribbon.
I played around with color combinations for this trio of bags and added a heart shaped tag using the Shapes: Hearts die collection and sentiments from Taglines and Love Cupid.
These little guys came together really quickly and could be easily mass produced for friends, coworkers or teachers.
I hope I've inspired you to get creative with your Party Favor #2 Die! Now it's time for more inspiration from the CSS Design Team:


Amber, I love how innovative you are here! What fabulous way to use that Party Favor 2 lid! Genius! And so simple!
ReplyDeleteThis is so cute! Love how you used the top to add some extra oomph to your bag bottom.
ReplyDeleteFabulous!!!! I could see these beauties making the perfect party favour for each place setting - scrummy! :)
ReplyDeleteHugs,
Aimes
x
SWEET!! Darling projects!
ReplyDeleteSuch cute party bags! Great design :)
ReplyDeleteThis is such a great idea, the base at the bottom definitely makes them look more formal, I love it!
ReplyDelete